
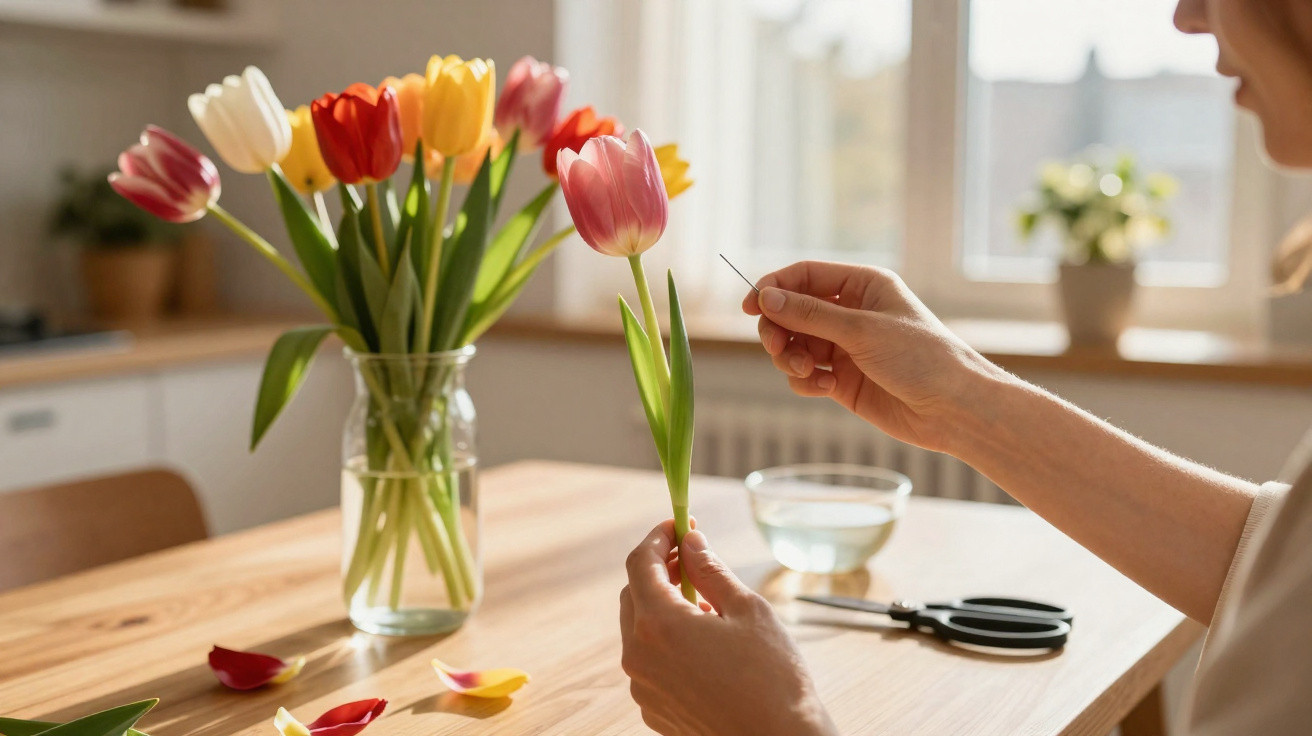
With a remarkably simple trick, drooping tulip stems can be made to stand upright again in seconds.
Anyone who loves tulips will know the issue: placed in a vase looking fresh in the evening, their heads are leaning sideways like tired acrobats by the next morning. In a British experiment, an amateur gardener compared several household remedies side by side – and found a clear winner that takes just three seconds and needs no specialist equipment.
Why tulips droop so quickly in a vase
Many people see drooping tulips as a sign of “poor quality”. In fact, the flowers are behaving perfectly normally. Tulips continue to grow even after they have been cut and placed in a vase.
They bend towards the brightest point in the room, turn slightly and grow a little taller each day. At the same time, they carry a relatively heavy flower head. Their stems, however, are soft and hollow inside. Over time, this combination means that the stem simply gives way and tips over the edge of the vase.
Central heating makes matters worse. Warm, dry air draws moisture from the leaves and blooms, leaving the stem softer and less stable. If the vase is also positioned on a sunny windowsill or beside a bowl of ripe fruit, the plant is under even greater stress. Ripening fruit releases ethylene gas, which causes cut flowers to age more quickly.
Florists also report another, less widely known effect: a tiny air lock can easily form inside tulips’ hollow stems. Bacteria and air bubbles block the water channels, so hardly any liquid can reach the upper part of the flower. The bloom droops even though there is still plenty of water in the vase.
Drooping tulips are rarely “poor quality” – growth, warmth and tiny air bubbles in the stem are usually responsible.
The kitchen test: four vases and one clear result
An Instagram gardener wanted to better understand precisely this combination of growth, room conditions and air bubbles. Rather than simply throwing away the limp tulips, she set up a small kitchen experiment using four miniature vases.
She followed a strict method: each tulip received a fresh diagonal cut under water, preventing additional oxygen from entering the stem. She then placed two stems in each of four identical vases, all positioned in the same spot on the worktop.
The test variants were as follows:
- Vase 1: water with a dash of vodka
- Vase 2: water with a few coins placed at the bottom
- Vase 3: tap water only, as a control
- Vase 4: tap water – plus a fine puncture with a drawing pin just below the flowers
All four vases remained in the same corner for six days, with identical light and room temperature. This made it easy to see which remedy genuinely worked and which was more of a gardening myth.
The 3-second needle trick: how tulips suddenly stand upright again
After only a few days, the outcome was clear. The tulips in the alcohol-and-water mixture looked drained most quickly. Their stems became soft, while the leaves dropped down with almost no resistance. The coin vase and the plain-water vase fared slightly better, but their flower heads eventually slumped over the rim too.
The fourth group looked entirely different. Where the gardener had pierced each tulip with a thin needle directly beneath the petals, the stems remained noticeably firmer. In her video, she described it as a “very clear winner” among all the tricks tested.
The explanation is straightforward: puncturing the green stem creates a tiny “vent hole”. Trapped air, which would otherwise sit inside like a plug, can escape. Water can then rise freely again, the bloom receives enough hydration and the tulip straightens up.
A single puncture with a needle beneath the flower head may be enough to make a limp tulip stand upright again.
How to use the tulip needle trick safely at home
To try the needle trick yourself, you need only a few things: a clean vase, clear water, sharp scissors or a knife, and a drawing pin or sewing needle.
- Remove the tulips from the vase and cut around 1–3 centimetres from every stem at an angle under water.
- Rinse the vase thoroughly, refill it with fresh, cool water and, if desired, stir in flower food.
- For each tulip, carefully pierce the green stem once from side to side with a clean needle directly beneath the flower.
- Return the tulips to the water and move the vase to a cooler spot away from direct sunlight.
Many amateur gardeners report that their tulips become noticeably more upright within a short time. The earlier you intervene, the better it works – naturally, it cannot revive flowers that have dried out completely.
Other ways to keep tulips looking beautiful for longer
The needle puncture is only one part of the solution. Anyone wanting to enjoy these spring flowers for longer can also adjust several other factors.
Choose the right vase and location for tulips
Tulips do well in relatively tall, narrow vases. The sides provide the stems with gentle support without squeezing them. Placing them in a very wide bowl almost automatically encourages them to topple over.
Location matters too. A bright but not sun-drenched place away from radiators and fireplaces is ideal. A dining table in the middle of the room or a sideboard in the hallway is usually better than a hot windowsill directly above a radiator.
Clean water and shorter stems
Changing the water frequently can give tulips several extra days. At least every other day, it is worth emptying the vase, rinsing it out and refilling it with fresh water. You can also trim the stems slightly again at this point to keep water uptake at its best.
Keeping tulips a little shorter also improves their stability. Shorter stems are less likely to flop over because the flower head has less leverage. Florists deliberately cut bouquets more firmly for low vases than for tall floor vases.
What to avoid
- Packing tulips extremely tightly into a small vase with other strongly scented flowers, such as hyacinths
- Positioning the vase beside fruit bowls containing bananas, apples or pears
- Filling the vase with very warm water
- Ignoring old, slimy residue around the vase rim, where bacteria collect
How the needle trick works with other cut flowers
The needle method is particularly suitable for flowers with relatively soft, hollow stems, such as tulips. For stems that are very firm or woody, the small puncture offers little benefit. Other techniques are more helpful in these cases, such as making a cross-cut in the base of the stem or carefully crushing the lower section with a hammer to allow more water to enter.
Care is also needed with daffodils. They release a slimy sap that harms other flowers sharing the same water. The needle trick does not solve this issue, so daffodils are best displayed in their own vase.
Risks, mistakes and how to avoid them
Many people feel nervous at first about using a needle on fresh flowers. The stem appears delicate and the flower head valuable. If you push the needle too deeply and damage the inner area, you can indeed harm individual water channels.
For that reason, puncture the stem only once rather than repeatedly “poking around”. A thin, clean needle is sufficient, and the puncture should sit just below the bloom rather than straight through the base of the flower. After making the hole, return the tulip to water as quickly as possible so that its water channels remain filled.
Contaminated tools present another risk. A needle that has just been sitting in a sewing box may introduce bacteria into the plant. To be on the safe side, briefly rinse the needle with hot water or wipe it with a little alcohol before using it on the tulips.
Why the effort is worthwhile for tulip fans
Especially in late winter and early spring, tulips can lift the mood on a table. A bouquet adds colour while the weather outside is still grey. It is understandably frustrating, then, to watch the stems go limp after just one night.
The needle trick takes hardly any time, yet it can often preserve several extra days of flowering and make costly bouquets much better value. Combined with fresh water, a slightly cooler location and clean vases, this small kitchen experiment becomes a practical everyday strategy for anyone who wants to enjoy their tulips for more than one evening.

Comments
No comments yet. Be the first to comment!
Leave a Comment