
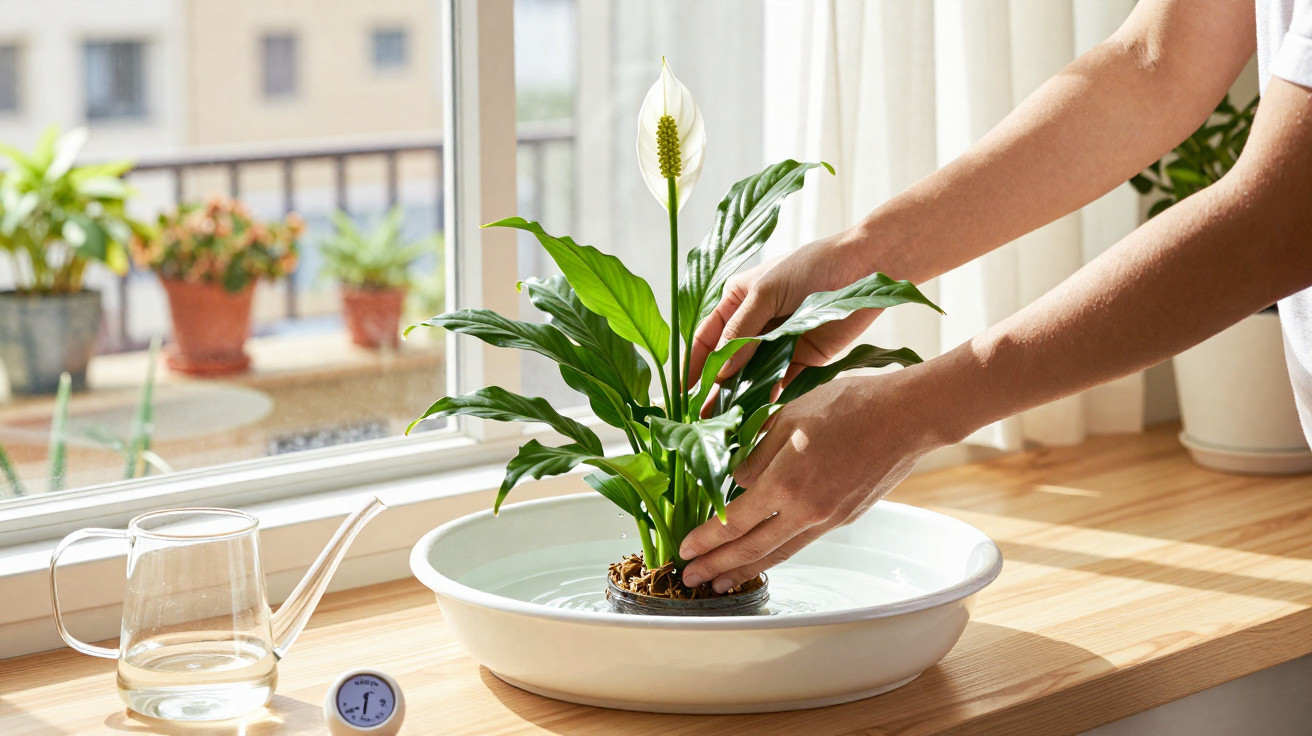
A small watering trick can change all of that completely.
Countless living rooms contain a lush green peace lily in a pot. It appears healthy and has glossy leaves, yet the hoped-for elegant white flowers never arrive. Feeding it, repotting it or moving it to a new spot: many people try every possible solution without success. In most cases, however, the key is far simpler: how the water reaches its roots.
Why your peace lily survives but does not properly flower
The peace lily (botanical name: Spathiphyllum) originates in tropical forests. There, it grows in the shade of larger plants, in soil that remains consistently fresh without ever becoming a soggy puddle. It needs that same balance in a pot.
In many homes, the opposite happens. Either it is watered only occasionally, once its leaves are already hanging limp, or the pot sits permanently in a saucer of water, causing its roots to rot gradually.
The plant is not thinking, “How can I flower beautifully?” but rather, “How do I survive?” – and flower production is the first thing it cuts.
When water is regularly lacking, the peace lily switches into survival mode. It just about keeps going, but produces hardly any new flower stems. On the other hand, if it is kept continually too wet, the roots are deprived of oxygen and begin to rot; flowering will then either fail altogether or stop early.
The simple finger test: how to spot the perfect time to water
Rather than watering according to a timetable, use an old-fashioned but exceptionally reliable approach: the finger test. It makes watering intuitive and automatically adapts to the temperature, season and position.
- Push your finger roughly two to three centimetres into the compost.
- If the top layer feels dry but the compost beneath is still slightly fresh, it is the ideal time to water.
- If everything is dry, including deeper down, the plant urgently needs water.
- If the compost is clearly damp all the way down, leave the watering can alone.
The peace lily also “speaks” through its leaves: if they droop significantly, it is thirsty. When you respond promptly with water, they will usually stand upright again within a few hours. If this happens repeatedly, the watering intervals are too long – water a little earlier, before visible stress sets in.
Working with the seasons: how often you should really water
Anyone following a fixed watering schedule, such as “Mondays and Fridays”, will rarely get it exactly right. The plant requires very different amounts depending on the season and the conditions in the room.
| Season | Typical watering frequency | Note |
|---|---|---|
| Spring | 1–2 times per week | Growth begins, so check the compost more often |
| Summer | 2–3 times per week | Warm rooms dry out the compost faster |
| Autumn | Every 7–14 days | The plant slows down somewhat |
| Winter | Every 10–21 days | Cooler air means less evaporation |
These figures are only broad guidelines. The finger test, rather than the date on the calendar, should always determine what you do.
Let it draw up water rather than overwatering: bottom watering as a secret weapon
A common issue for houseplant enthusiasts is that fear of dryness leads them to pour too much water into the pot each time. With a peace lily, this can quickly result in root rot.
Bottom watering gives the plant control: it takes up only as much water as it genuinely needs.
To do this, place the pot in a tray, sink or larger bowl filled with water. Follow these steps:
- Fill the container with lukewarm, previously drawn water to a depth of around two to five centimetres.
- Set the pot inside so that the drainage holes at its base are sitting in the water.
- Allow the plant to absorb water for 10–15 minutes. The compost will draw it upwards from below.
- Remove the pot and let excess water drain away thoroughly.
- Return it to its decorative outer pot only once no more water is dripping from the holes.
This technique stops the surface from remaining wet all the time, which can attract fungi or fungus gnats. It also protects the roots from standing water at the bottom of the pot.
Light, position and humidity: even the best watering method needs them
The most careful watering routine will achieve little if the position is unsuitable. Peace lilies prefer bright but indirect light. Direct sunlight at south-facing windows scorches the leaves, while darker corners inhibit flower production.
- Ideal: A bright location one to two metres away from a window, without intense midday sun.
- Difficult: Directly by a south-facing window or in dark hallways with no daylight.
- Critical: Immediately above radiators, where the air is very dry.
As a tropical plant, the peace lily appreciates slightly higher humidity. Indoor air is too dry in many homes, particularly during winter. A few simple measures can improve this easily.
On warm days, you can lightly mist the leaves with low-limescale water. Alternatively, place the pot on a saucer filled with damp expanded clay pellets. The plant should rest on the pellets, rather than directly in the water. As the water evaporates, it creates a small pocket of humidity around the plant.
Interpreting warning signs: how to read your peace lily
Anyone who watches their plant closely will soon notice whether its care routine is working. These are typical signs and their likely causes:
- Limp, drooping leaves and bone-dry compost: Too little water; water thoroughly straight away.
- Yellow leaves, soggy compost and a musty smell: Too much water; root rot is a risk, so allow the pot to dry or repot the plant.
- Brown tips: Often caused by air that is too dry or water with a high limescale content.
- Lots of leaves but hardly any flowers: Too little light or an unsuitable watering rhythm; check the position.
If leaves turn yellow and soft from the bottom upwards, inspect the root ball. A strong smell from the compost or black, soft roots indicates that the plant has been sitting too wet for too long. The only solution is to remove old rotten sections, place it in fresh, loose compost and water more carefully in future.
Which water, pot and compost? Small details, major results
Tap water is often suitable, provided it is not extremely hard. In areas with very hard water, peace lilies can be sensitive. Brown leaf edges are one indication. Filtered water or stored rainwater can be worthwhile in this situation.
Choosing the right pot matters too. A sealed decorative pot without drainage holes is risky. The ideal arrangement is an inner pot with holes in the base, placed inside a decorative outer pot. This ensures that excess water can always drain away.
For the growing medium, choose a loose, structurally stable houseplant compost. It should retain water effectively without clumping together. When repotting, it is worth adding a layer of expanded clay or coarse gravel to the bottom of the pot. This improves drainage and considerably reduces the risk of waterlogging.
When you can expect new flowers
Changing your watering method calls for a little patience. Although the peace lily generally responds fairly quickly with more vigorous leaves, new flowers usually take several weeks to appear. It will only begin flowering properly again once it has built up sufficient energy reserves and is in the right position.
When the balance of lightly moist compost, indirect light and slightly higher humidity is right, the peace lily often flowers several times a year.
A light green-plant feed in spring and summer, used according to the instructions on the packet, supports flower formation but never replaces a proper watering routine. Anyone who only feeds the plant while continuing to water too heavily or too sparingly is unlikely to see much success.
Of particular interest to many amateur gardeners: the basic principles that work for the peace lily – compost that is slightly moist but never wet, the finger test instead of a watering timetable, and bottom watering – can be applied to many other houseplants. Once you have adopted this routine, it can often save peace lilies, calatheas and other tropical species from poor growth and leaf loss.
Comments
No comments yet. Be the first to comment!
Leave a Comment