
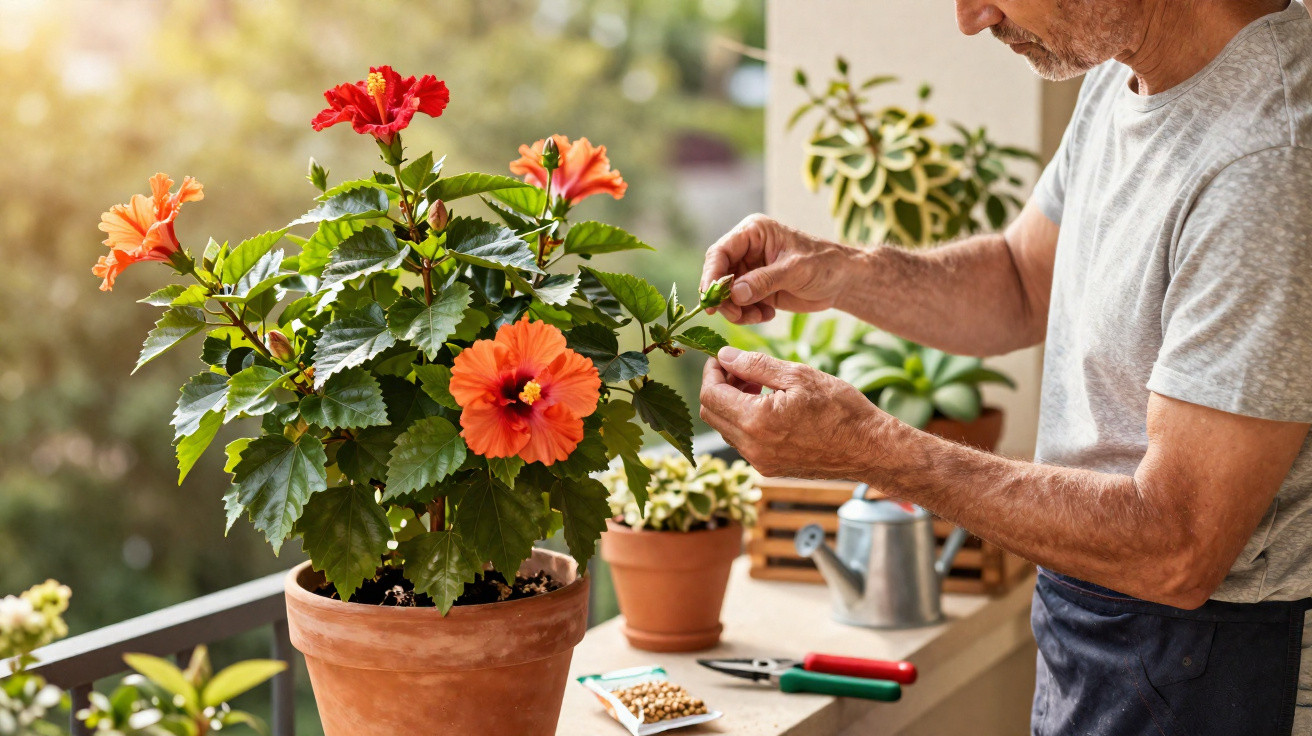
Many amateur gardeners are surprised by their hibiscus in spring: long, bare shoots, one or two flowers at the top, and a yawning emptiness below. Yet one tiny intervention in March can transform this picture completely. If you catch the right moment and act in the right place, you can redirect the plant’s energy and encourage considerably more flower buds.
Why hibiscus looks so forlorn after winter
Whether it is an indoor hibiscus in a pot or a garden hibiscus in a border, the plant often appears tired after winter. Its shoots are long and thin, many leaves have dropped from the base, and at the top there is a sparse “mop” with only a few buds. This is not caused by poor care, but simply by the plant growing towards the light during the dark months.
The hibiscus concentrates its energy at the tip of each shoot. This is where a type of “leader bud” develops, controlling further growth. While it remains active, the dormant buds along the sides stay on standby. The result is a handful of long shoots rather than compact, bushy growth.
The ideal timing: why March changes everything
The crucial period starts as winter eases and the days become longer. From early March until roughly mid-April, the hibiscus begins growing again: sap starts to rise, buds swell and the plant visibly wakes up, while the intense heat of summer is still some way off.
During this short transitional period, hibiscus responds particularly strongly to small interventions and forgives mistakes much more readily than it does later in the year.
Acting now brings several advantages at once:
- less stress for the plant as it is just becoming active
- rapid healing of wounds at the shoot tips
- strong new growth within only a few weeks
- ideal preparation for a long flowering season
This method works for both potted Hibiscus rosa-sinensis and garden-grown Hibiscus syriacus. Large-flowered swamp hibiscus also benefits once its fresh shoots have become visible.
The three-second trick: how to double your hibiscus flowers
The actual trick sounds almost too simple: remove the tip of the shoot deliberately. Gardeners call this “pinching” the tip. In practice, it is a tiny cut that genuinely takes just a few seconds per shoot.
Step-by-step guide to pinching
- Find a young, still flexible shoot tip with three to four pairs of leaves.
- Briefly disinfect your thumb and forefinger, or your tool, with alcohol of around 70%.
- Hold the uppermost bud directly above a leaf node.
- Pinch or cut the tip off cleanly; a smooth cut is important.
This really does take only a moment for each shoot. Choosing the correct position matters: do not cut too far down, as this removes unnecessary leaf mass, but do not cut too high either, as the effect will be limited.
By removing the tip, a shoot will generally divide into two or three new side branches – and each of these can later carry flowers.
This is precisely the principle behind the method. At the shoot tip, hibiscus produces a mixture of plant hormones associated with what is known as “apical dominance”. It suppresses the side buds. Removing the tip effectively switches off this hormonal control point. The stored energy is redistributed and the dormant buds along the shoot begin to grow.
A common problem: the “feather duster” behind the window
A familiar sight in living rooms is a hibiscus placed directly beside a large window. It grows towards the light on one side, loses an increasing number of leaves lower down and eventually becomes a thin feather duster with just a few flowers at the top. Many owners eventually give up on these plants in frustration.
This is exactly where the three-second trick can rescue the season. Removing the tips from leggy shoots forces the plant to form new branches lower down. It also helps to turn the pot a little each week. This spreads the available light more evenly, helping the hibiscus grow more densely and sturdily.
There are just two things to avoid:
- do not pinch very woody, old shoots, as hibiscus is less likely to produce new growth there
- do not remove tips that already carry a clearly developed bud if you still want to see that particular flower
In favourable conditions, the first new side shoots appear after two to three weeks, providing visible proof that the treatment has worked.
What to do with the cut tips: grow new hibiscus plants
The removed shoot tips do not have to go in the bin. On the contrary, they can be used to propagate new plants with ease. In time, a single specimen can become a small hibiscus collection.
Rooting in compost: turning cuttings into a new shrub
Cut pieces of shoot measuring around 10 centimetres or more are suitable. Proceed as follows:
- Cut the base of the shoot diagonally, directly beneath a node.
- Remove every leaf from the lower section so that nothing rots in the growing medium.
- Leave two to four leaves at the top, cutting them in half if necessary to reduce moisture loss.
- Place the cuttings in loose, lightly moist compost, ideally seed compost or a blend of potting compost and sand.
To improve the chances of success, briefly dip the cut surface into rooting powder or an infusion made from willow twigs. Such preparations contain natural growth substances that stimulate root formation.
For the coming weeks, choose a bright position away from direct midday sun, with temperatures between 15 and 20 °C. Keep the compost consistently lightly moist, but never completely wet. Waterlogging is the enemy of every young root.
Cuttings in a glass of water: the easy option for impatient gardeners
Anyone who enjoys seeing what is happening below the surface can place the shoot tips in a glass of water. The same rule applies here: remove the lower leaves so that nothing decays. Replace the water with fresh water every few days; otherwise, bacterial growth can increase and the cuttings may rot.
In favourable conditions, the first pale root tips appear after around two weeks – the point at which many amateur gardeners become hooked on taking cuttings.
Once a small network of roots has formed, carefully transfer the young plants into compost. After becoming established, they behave like any other hibiscus and can also be encouraged to produce more flowers with the three-second trick from the following year.
Care around the March trick: light, water and nutrients
This brief intervention only reaches its full potential when the growing conditions are right. After pinching, hibiscus needs sufficient light, regular watering and gradually increasing nutrients again.
- Light: a bright location; for indoor plants, directly by a window, and in the garden preferably in sun or partial shade
- Water: keep evenly moist, but do not leave the roots wet; water smaller amounts more frequently instead
- Fertiliser: from April, use a liquid flowering-plant fertiliser every two weeks; slow-release fertiliser is also suitable for pots
If you keep your hibiscus in a pot, check in spring whether it needs a larger container as well. If many roots are visible and the compost is heavily rooted through, repotting is worthwhile. More room around the roots strongly supports the growth of new shoots.
Common mistakes – and how to avoid them
The three-second trick is considered very forgiving, but a few classic mistakes still occur:
- Pinching too late: waiting until high summer stresses the plant in hot weather and shortens its flowering time.
- Untidy cuts: ragged or crushed tips heal less well and give fungi an easy entry point.
- Choosing the wrong shoots: leave heavily woody or weakened branches alone, as the intervention is rarely worthwhile there.
- Overdoing it: do not remove every shoot at once; proceed gently and watch how the plant responds.
Keeping these points in mind often leads to a real surprise in the weeks after cutting: the thin, sad hibiscus becomes a compact bush with numerous fresh shoots – and therefore far more potential flowers.
Why the March intervention pays off in the long term
This brief treatment does more than alter the current flowering season. It shapes the entire structure of the shrub. Plants whose tips are shortened regularly in spring develop a much stronger framework of branches. They are less likely to topple over, become bare at the base less often and are easier to keep in shape.
Those who pinch consistently each March or early April for several years gradually create a kind of “flowering ball”. Especially on balconies or terraces, such a potted hibiscus becomes a small exotic focal point, without requiring hours of complicated pruning techniques.
The perhaps most important point is this: many plants thought to be “fussy” respond extremely well to small, carefully targeted actions. Hibiscus belongs firmly in this category. Anyone willing to intervene at the shoot tips in March will be rewarded in summer – with flowering that is noticeably fuller and longer-lasting.
Comments
No comments yet. Be the first to comment!
Leave a Comment