
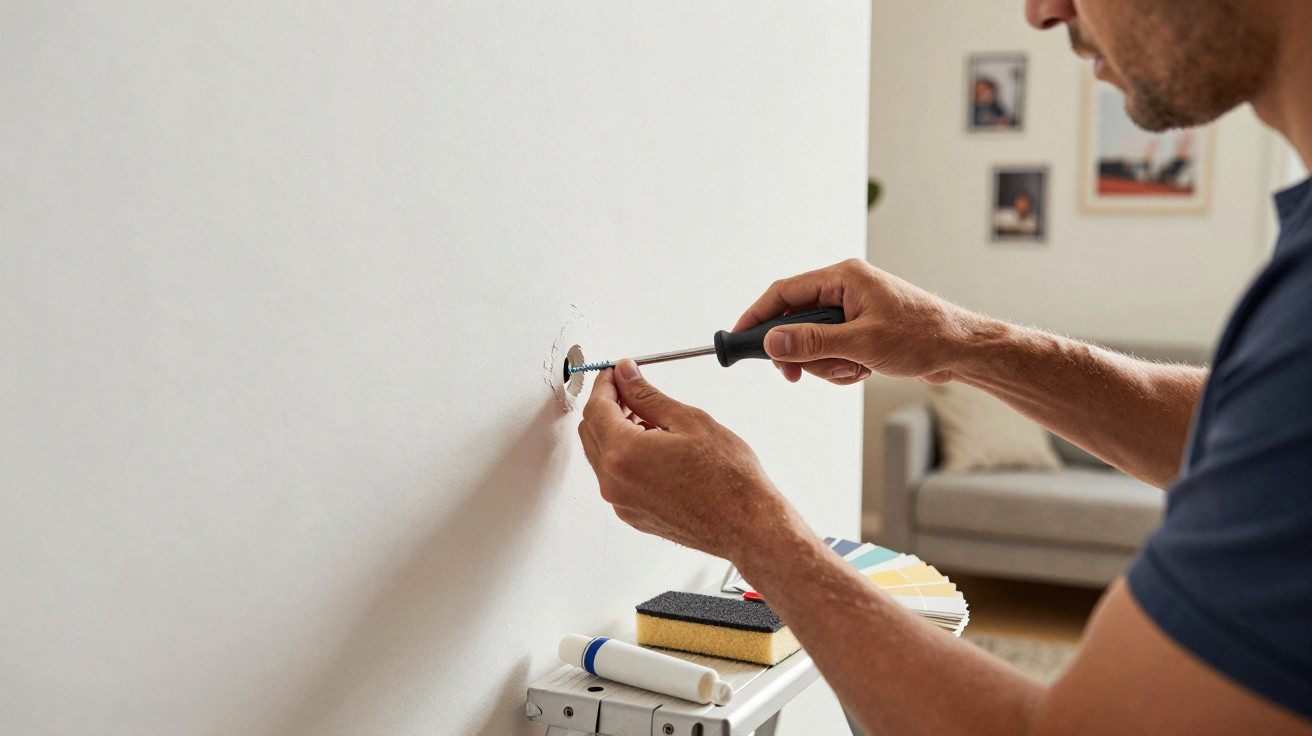
A simple trick can leave the surface smooth again.
Anyone rearranging their home notices it straight away: where a board, mirror or wall shelf was hanging moments ago, unsightly wall-plug holes are now exposed. Many people automatically reach for pliers – and end up tearing away the plaster as well. Yet with a steady hand, an ordinary screw and a little filler, the wall can be repaired so thoroughly that nobody will later see where it was drilled.
Why brute force ruins plaster
The familiar approach is to grab the nearest pair of pliers, clamp onto the visible edge of the wall plug and pull. At best, the plug comes out in a mangled state. At worst, the plaster around it breaks away, the paint flakes off, and a small hole turns into damage the size of a hand.
“A wall plug is designed to stay in the material – anyone who simply pulls at it is fighting the wall itself.”
Whether it is a metal cavity fixing or a basic plastic wall plug in masonry, each is made to take holding forces rather than come out easily. They expand inside the wall, grip with claws or anchors, and lock firmly into the substrate.
A sharp outward pull puts force not only on the plastic but also on the crumbly gypsum or plaster surrounding it. Plasterboard and old plaster are particularly prone to giving way, leaving a funnel-shaped hole that is much larger and takes far more work to repair than a careful, gradual removal.
Basic equipment for a “surgical” repair
You do not need half a workshop to rescue a wall professionally. In most cases, the contents of a normal toolbox are enough.
- A screw of a suitable or slightly smaller diameter
- Flat-nose pliers or water-pump pliers
- A screwdriver suited to the chosen screw
- A flexible filling knife or decorating knife
- Crack filler or wall filler
- Fine-grit sandpaper (120–180)
A small piece of card or wood is also useful for protecting the wall while levering with the pliers.
The screw method: removing wall plugs without tearing plaster
Creating a secure grip with a screw
The main issue with old wall plugs is that they are often cut flush with the wall or have become crumbly, making them almost impossible to grip. This is where the straightforward but highly effective trick comes in.
Screw in a suitable screw, but only by a few turns. Depending on the wall, a screw depth of one to two centimetres is usually enough. The screw needs to grip firmly, but it must not push the wall plug further back and expand it more.
“The screw turns the wall plug into a solid metal handle – instead of applying force to brittle plastic, you are working from a stable point.”
From this point onwards, you are no longer handling the fragile wall plug itself but the screw instead. That reduces the chance of the plastic splitting and forcing you to tug at the wall after all.
Lever gently rather than pulling hard
Now grip the screw with the flat-nose pliers. The key point is not to pull it directly forwards. It is better to combine a light pulling motion with careful rocking.
Small rocking movements from side to side, or up and down, gradually release the wall plug from its fixing. Apply only moderate outward tension. If available, place a small piece of wood or card beneath the pliers to protect the wall and create a fulcrum.
This levering action brings the wall plug out of the drilled hole step by step, rather than ripping it out in one sudden movement. What remains is a relatively clean, cylindrical hole, only minimally wider than its original diameter.
Filling the hole neatly so it disappears
Choosing the right filler
Many people still rely on toothpaste, soap or household hacks. All of these makeshift solutions crack quickly, turn yellow or shrink considerably. For a durable result, proper filling material is essential.
- Small wall-plug holes (up to around 8–10 mm): ready-mixed filler from a tube or tub is entirely sufficient.
- Large voids (for example, those left by heavy-duty wall plugs): powdered filler freshly mixed with water sets particularly firmly and is less likely to shrink.
Anyone who regularly changes things around at home would be wise to keep a small tub of universal wall filler on hand. It can save an inconvenient trip to the DIY shop on a Sunday evening.
Fill properly and leave a slight raised area
When filling, the rule is not to be too sparing. Use the tip of the filling knife to press the material firmly into the hole until every corner is filled. Trapped air can later cause sunken areas that show up clearly in angled light.
“The filler can stand slightly proud – a small bump is easier to sand down than an unattractive dip is to correct.”
Smooth the surface with several passes, working once across and once lengthways. Do not scrape too firmly, otherwise you will pull the material back out of the hole. The aim is a smooth surface with a very thin raised layer of around one millimetre.
Depending on the product and the size of the hole, the filler needs between two hours and one day to dry. If in doubt, wait a little longer: damp material merely smears during sanding and will not produce a clean edge.
Final sanding and paint: removing the last trace
Recreate the original texture with fine sandpaper
Once the filler has fully hardened, it is time for sandpaper. Using a fine grit and gentle circular movements, carefully sand back the raised material. Do not apply pressure, or you may create a hollow.
The best test is the back of your hand: if you run it over the area and can no longer feel a transition, the surface is smooth enough. Very smooth plasterboard walls should feel “silky”, while on lightly textured paintwork it is enough for the join to be imperceptible to the touch.
Colour camouflage: a clever way to avoid visible patches
Without fresh paint, a pale matt mark will remain. The repair only becomes truly flawless once it has been painted. Anyone with some of the original paint left over has a clear advantage. If not, it is worth finding the closest possible colour match at a DIY shop.
“Do not apply the new paint as a sharply defined square; instead, fade it gently into the existing surface.”
Load only a small amount of paint onto a brush or mini roller. Cover the filled area first, then draw the paint outwards in a thin layer and soften the edges using an almost dry roller. This creates a gradual blend rather than an obvious patch.
When several holes or crumbly walls cause problems
Several old wall plugs in a row? This is the approach
Behind old cabinets or highboards, many living-room walls resemble Swiss cheese. Rather than tackling every hole separately and at random, a systematic method works better:
- Remove all wall plugs one after another using the screw method.
- Mark larger break-outs and, where necessary, lightly dampen them so the filler adheres better.
- Draw a longer strip of filler across several holes that sit close together.
- Once dry, sand the whole area rather than only isolated spots.
This produces an even wall area instead of multiple separate repair patches that remain faintly visible.
Crumbly walls in older properties: extra measures for difficult surfaces
In older flats, there is often friable plaster beneath the wallpaper that produces dust even when touched. Filler adheres much less effectively in these conditions. First, lightly brush the area around the hole and remove all dust thoroughly.
A deep-penetrating primer or a heavily diluted bonding primer can then consolidate the substrate. Fill the hole only afterwards. This reduces the risk of the repaired area cracking or breaking away again later.
More confidence with decoration: easier drilling when you can repair it
Anyone who has mastered a good technique for removing and filling wall-plug holes can plan their interior far more freely. Picture ledges, a TV bracket or wall-mounted kitchen cupboards all feel less permanent when you know their traces can later be repaired almost invisibly.
This can be a real advantage in rented homes in particular. Neatly completed repairs help avoid disputes when handing the property back. It also makes it easier to personalise bare walls properly, rather than hanging everything from one hook for fear of making holes.
Whether it is a small nail or a thick wall plug, what matters is patience, the right tools and a few techniques that are quickly learnt. Even a wall covered with old fixings can then look freshly plastered again – without paying for expensive professionals.





Comments
No comments yet. Be the first to comment!
Leave a Comment