
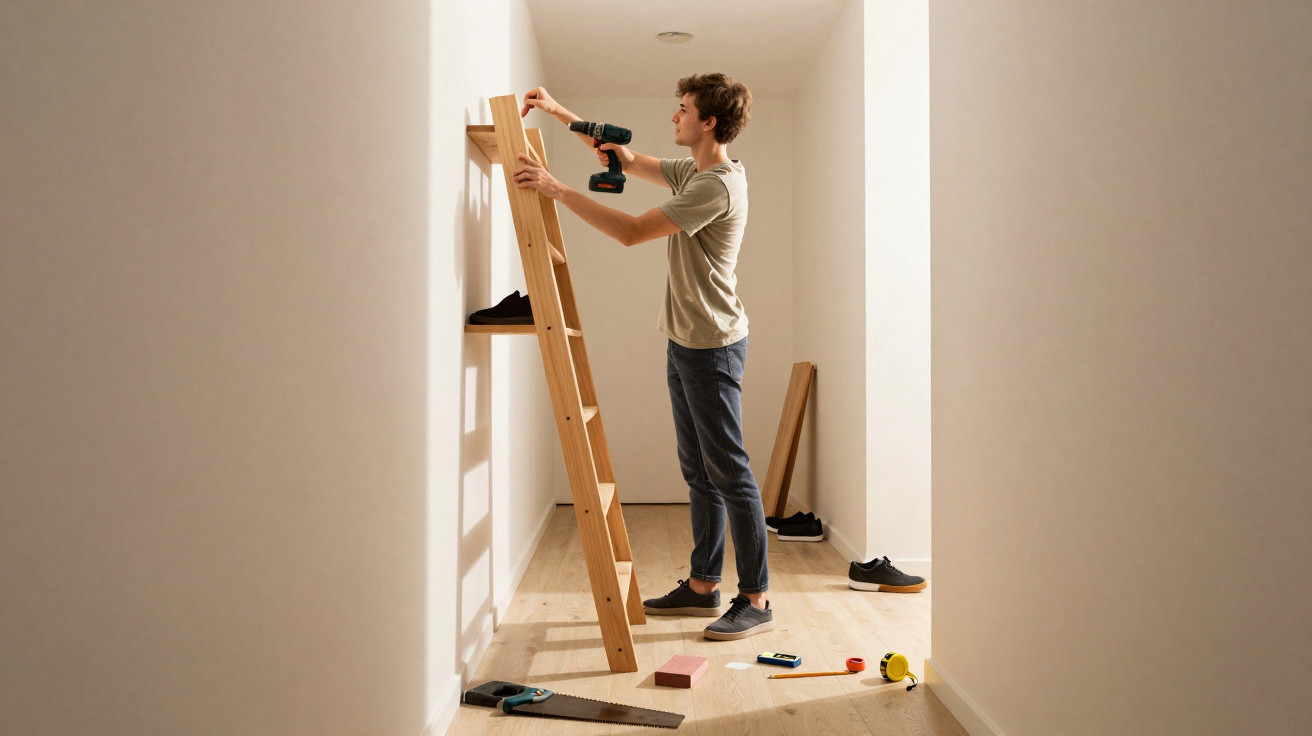
Many flats share the same issue: a tiny entrance, almost nowhere to put furniture and a pile of shoes that grows every day. To keep this area tidy and safe, you need a piece that fits your exact floor plan rather than taking up half the hallway. The good news is that a few timber offcuts and basic tools are enough to make a sturdy, virtually free shoe rack that clears the floor and helps prevent falls.
Why a well-designed shoe rack transforms the hallway
Even a narrow corridor measuring four metres long and one metre wide can become seriously obstructed by just a few pairs of shoes. In particular, entrances in urban flats of 20 to 30 square metres quickly turn into trip hazards, especially when you need to get through with shopping bags or a pushchair.
“A slim, thoughtfully designed shoe unit lifts shoes off the floor, creates visual calm and substantially reduces the risk of falls.”
For cramped hallways, interior designers recommend furniture only 15 to 20 centimetres deep. This is sufficient for trainers, low shoes and even many ankle boots, without noticeably reducing the walking space. Building the rack yourself lets you use every millimetre of the available area, instead of having to accept the standard dimensions offered by furniture shops.
It is especially useful that timber left over from earlier projects-such as roof battens, boards from discarded shelving or pallet wood-can be reused. This saves money, cuts waste and can produce a piece of furniture that feels considerably sturdier than some inexpensive ready-made chipboard cabinets.
Ladder-style shoe rack: sturdy, affordable and quick to make
One particularly strong option is based on a ladder-style construction. It consists of two upright side rails with angled shelves fitted between them, allowing shoes to rest with a slight forward tilt. This keeps everything visible while requiring very little depth.
Materials and tools at a glance
- Timber offcuts, such as boards around 15 cm wide or structural timber measuring 40 x 60 mm
- Wood screws and, if required, wood glue
- A saw, either a mitre saw or a hand saw
- A cordless drill/driver with a drilling function
- Tape measure, pencil, set square and spirit level
- Sandpaper or a sanding block
Wide leftover boards can be used for both the side panels and shelves. If you are using structural timber, make the side pieces as small ladders and cover them with slats.
Building the shoe rack step by step
For a conventional free-standing rack with three levels and a height of roughly 90 to 100 centimetres, follow these steps:
- Cut two side panels to size, for instance 90 cm long and 15 cm wide.
- Trim three shelves to the required width, such as 60 to 80 cm.
- If the shelves are to be installed at a slight angle, you can optionally mitre-cut their front edges.
- Mark the lowest shelf around 5 to 10 cm above the floor, place the middle shelf halfway up and position the upper shelf just below the top edge.
- Pre-drill and screw the shelves to one side panel first, then fit the second side panel and screw it into place as well.
When working with structural timber, first build one “ladder” for each side. The rungs should slope forwards at an angle of around 20 degrees. Cut their ends at an angle so they sit flush against the side rails. Then fit two or three narrow slats across each rung to create an airy shelf.
“A gentle tilt of around 20 degrees is enough to keep shoes secure while sacrificing very little depth.”
Making the shoe rack genuinely stable
A quick check will help ensure the unit does not wobble:
- Measure diagonally: if the measurements from corner to corner match, the rack is square.
- A cross brace or a rear panel made from a thin board noticeably improves rigidity.
- In homes with children, secure the rack to the wall using brackets.
If you clean the hallway regularly, raise the feet by a few centimetres so that a mop or vacuum cleaner can easily pass underneath.
Wall-mounted shoe rack with adjustable shelves for extremely tight spaces
A wall-mounted shoe rack saves even more room, as it has no feet and its shelves can be set at different heights. The floor remains entirely clear, leaving space below the shoes for a child’s bicycle or vacuum cleaner.
Making wooden support rails
Rather than buying costly metal rails, you can cut simple support pieces from narrow timber strips. Typical dimensions are around 1.3 cm thick, 5 cm high and 25 cm long. Screw two of these strips horizontally next to each other on the wall, on both the left and right sides, leaving a small gap between them. These pairs form supports for square shelves.
Suitable shelves can be made from boards measuring approximately 25 x 25 cm and about 2.5 cm thick. Simply slide the boards onto the supports. If extra height is needed, move a board up by one level. This gives each type of footwear its own space:
- lower level: trainers, children’s shoes or slippers
- middle level: low shoes and lighter ankle boots
- top level: tall boots or pairs worn infrequently
Aligning the system securely on the wall
Start by using a spirit level to mark a straight horizontal baseline. Screw the first support rails along this line. Continue upwards one row at a time, spacing them, for example, 20 to 25 centimetres apart.
Particularly in an entrance or communal hallway, check how the rack relates to the rest of the furnishings: will the top row still fit beneath the coat rack? Can you still reach the flat door or electrical consumer unit? A simple strip of cardboard used as a template lets you test the spacing in advance.
In a cellar or garage, the lowest row should not finish directly at floor level. Setting it 10 to 15 centimetres higher protects footwear from moisture and makes the floor easier to clean.
Preparing timber properly: no splinters, no damage to shoes
Used timber often comes with dents and rough edges. A brief sanding session is all that is needed to turn it into practical everyday furniture. Lightly round over the front edges and corners in particular, so delicate shoe toes stay protected.
“Rounded, sanded front edges prevent pressure marks on leather and make the rack safer for children.”
Very dry timber may have small cracks or chipped sections. These can be filled using wood glue or wood filler. To improve the rack’s appearance, use clear varnish, wax or wood stain. Pale shades make a hallway appear larger, while darker colours emphasise the contrast against light walls.
Safety, load capacity and sensible planning
Shoes may seem lightweight, but several levels filled with winter boots soon add up. It is therefore worth considering three points:
- Screw length: Choose screws that are slightly longer so they grip deeply into the timber.
- Wall type: A standard wall plug holds in concrete or brick, while plasterboard requires specialist cavity fixings.
- Loading: Store heavier footwear in the lower compartments and keep lighter pairs on top.
Before fixing anything permanently, make a rough plan on paper. Factoring in the number of household members, the seasons and the usual types of footwear avoids having to rearrange everything later. For example, a family of four with summer and winter shoes can easily accumulate 20 to 25 pairs for everyday use alone.
Further ideas and useful additions
The principle of “timber offcuts instead of throwing them away” can easily be extended. Fit a narrow board with hooks between the shoe rows for keys or a dog lead. A small box mounted on top can hold shoe polish, waterproofing spray and brushes. Where ceilings are high, use the upper area for rarely worn shoes stored in boxes or baskets.
The same principle can also be used to create a mini rack in a child’s bedroom, simply made lower and painted in brighter colours. Children can reach their own shoes, learn to keep things organised and are less likely to trip over pairs left on the floor. For very young children, it is also advisable to place a non-slip mat in front of the rack, so nothing slides while they put shoes on or take them off.
An organised shoe storage system also benefits allergy sufferers and households with pets: less dirt from outdoors is spread around the home, while dogs and cats are less likely to get at wet laces or soles covered in road salt. Combined with a washable doormat and a designated place for outdoor shoes, it can make the entrance more hygienic without the need to buy new furniture.



Comments
No comments yet. Be the first to comment!
Leave a Comment