
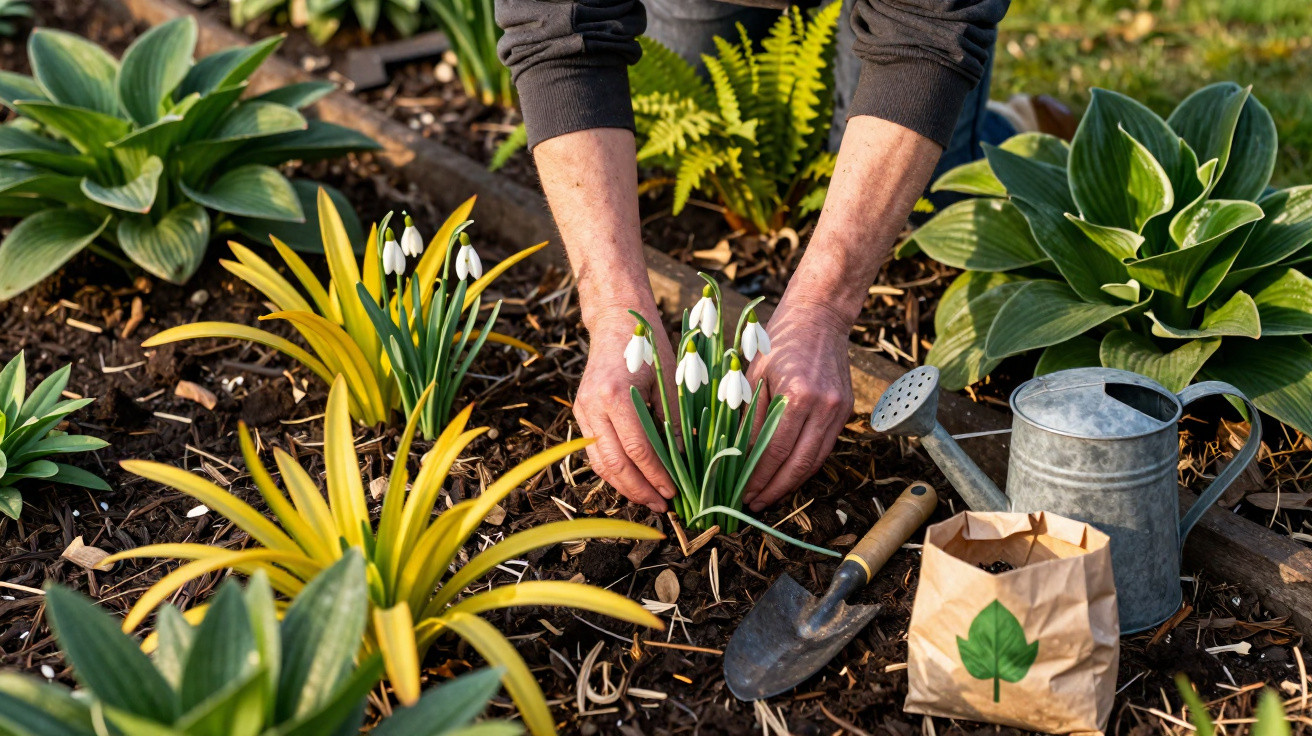
Snowdrops are seen as delicate heralds of winter, yet they are remarkably hardy. What happens once flowering has finished is crucial. Many amateur gardeners make mistakes at precisely this stage, weakening the bulbs over time. However, a few well-chosen measures can not only preserve established clumps but also help them multiply impressively.
Leave the leaves in place: why the “untidy” stage matters so much
Once the flowers have faded, many people instinctively reach for the scissors. The leaves flop over, gradually turn yellow and can look out of place in the border. That is exactly what you should resist doing.
“The green leaves are the bulb’s energy source – cutting them too soon reduces next year’s flowering.”
While the foliage remains green, the plant continues photosynthesising. It transfers energy and nutrients into the bulb, allowing it to rebuild its reserves. This process usually takes six to eight weeks after the final flower has faded.
If the foliage is cut off or pulled away during this period, the bulb loses part of its “battery”. The effects often do not become apparent until the following spring: fewer flowers, smaller clumps and, in some cases, no new blooms at all.
Untidy but essential – how to disguise yellowing leaves
If you dislike the appearance of gradually dying foliage, you can improve the look without harming the plants. Perennials that emerge in spring and slowly conceal the snowdrop leaves are particularly suitable:
- Hostas: They emerge a little later, produce broad leaves and cover the ground effectively.
- Ferns: They enjoy similar growing conditions, add structure and remain attractive throughout summer.
- Cranesbill (Geranium): It grows loosely, spreads across the soil and fills gaps in the border.
Plant these companions between and behind the snowdrop clumps. This keeps the bulbs supplied with energy while giving the border a tidier appearance.
Water correctly – but avoid waterlogging
While the leaves are still green, the bulbs need sufficient moisture. If spring is exceptionally dry, occasional watering is worthwhile. The soil should stay evenly moist rather than wet.
Too much water can cause fungal diseases and rot. A humus-rich, loose soil that retains moisture but drains excess water quickly is ideal. If your soil is heavy and prone to waterlogging, incorporate sand or fine grit along with compost.
Targeted feeding: when snowdrops need nutrients
The best time to apply fertiliser is immediately after flowering, while the foliage still looks healthy. At this point, the plants absorb nutrients especially well.
“A potassium-rich fertiliser after flowering strengthens the bulb – too much nitrogen only produces leaf growth.”
Choose a specialist fertiliser for spring-flowering bulbs or another product that is low in nitrogen and high in potassium. Potassium supports root development and resilience instead of merely encouraging lush green foliage.
A straightforward schedule has proved effective:
- Apply fertiliser as soon as the last flowers have withered.
- Water thoroughly so the nutrients reach the root zone.
- For weak clumps, apply a light second feed after around two weeks.
- Stop feeding once the foliage becomes noticeably yellow.
Organic options for active soil life
Anyone wishing to avoid mineral fertilisers can opt for natural alternatives. Bone meal and well-rotted compost are traditional choices. Both work slowly, but provide lasting benefits.
Scatter a thin layer around the clumps without digging over the shallow roots. Over time, this makes the soil looser, improves water retention and supplies the bulbs with nutrients across several seasons. Many experienced gardeners report that their snowdrops multiply steadily and become more vigorous with this treatment.
Dividing snowdrop clumps: the best time for new areas of planting
Over the years, snowdrop clumps can become so crowded that the plants begin to restrict one another. Flowering then weakens and they spread very little. This is the time to divide them.
“The ideal time is immediately after flowering, while the leaves are still green – the greatest chance of success comes from moving them ‘in the green’.”
Waiting until summer and replanting dry bulbs increases the risk of losses. When moved fresh, the plants have active roots and can establish themselves at their new site straight away.
| Step | Action | What to consider |
|---|---|---|
| 1 | Lift the clump with a garden fork | Insert it from the outside to avoid damaging bulbs |
| 2 | Carefully separate the bulbs into small groups | Keep the roots as undisturbed as possible |
| 3 | Replant immediately in the new position | Maintain the same planting depth as before |
| 4 | Water thoroughly | Ensure the roots have good contact with the soil |
Leave roughly eight to ten centimetres between the bulbs. This provides enough room for naturalising without the clumps becoming overly congested again within a few years.
Plan dense drifts rather than leaving them to chance
If you want large carpets of flowers, position the divided groups deliberately. Light woodland edges, beneath deciduous trees or alongside paths are ideal, as plenty of light still reaches the ground there in late winter.
Several small groups arranged in loose curves look more natural than one large block. Dividing and replanting in the green allows these plantings to spread faster than planting individual dry bulbs alone.
Border care after die-back: keeping the garden interesting
Eventually, the leaves will dry out completely and can be removed easily by hand. At this stage, they may be cleared away. Composting them returns their nutrients to the garden cycle.
A common mistake is forgetting where the bulbs are later in the year, then driving a spade through the clumps while planting. Small markers are useful. Thin wooden sticks or discreet plant labels are enough to identify the key areas.
Mulch in moderation – protection, not a barrier
A light mulch layer in summer retains soil moisture, suppresses weeds and helps maintain a more balanced soil structure. Suitable materials include:
- leaf-rich garden compost
- finely shredded leaves
- bark compost in moderate quantities
The layer should be two to no more than five centimetres deep. Thick, dense layers can obstruct emerging shoots in late winter or even encourage mould. Lightly textured materials that rot down gradually are much better suited.
Suitable companion plants for snowdrop borders
A well-planned border provides interest not only in late winter, but from February into autumn. Snowdrops prefer semi-shade and humus-rich soil, just like many traditional woodland and shade perennials.
Suitable companions include:
- liverworts and primroses for the early season
- lungwort and wood anemones as natural partners beneath trees and shrubs
- astilbes and hostas for summer structure
A thoughtful combination creates a layered display: first the white bells, followed by colourful mounds, then lush foliage perennials. This ensures snowdrops feel less like a brief interlude and more like the beginning of a long season.
Common mistakes – and how to avoid them
Most problems with snowdrops can be traced back to a few missteps. Knowing these pitfalls helps prevent frustration:
- Cutting back foliage too early: This significantly reduces flowering strength.
- Permanent waterlogging: This encourages rot, especially in heavy soil.
- Lifting bulbs in summer and storing them dry: This raises the risk of losses, particularly with sensitive varieties.
- Accidentally damaging plants when redesigning the border: Simple markers can prevent this.
Instead, allowing the foliage to die back naturally, feeding with purpose, dividing clumps in the green and planning the planting site for the long term will gradually create strong, extensive colonies.
How snowdrops benefit the garden over the long term
Well-managed snowdrop colonies offer more than visual appeal. They attract the first insects of the year, providing nectar and pollen when little else is flowering. Wild bees and other pollinators therefore benefit from the correct care of these small bulbs.
Improving the soil with organic fertiliser and mulch also creates better conditions for many other plants. The measures that strengthen snowdrops benefit the whole border: a more stable structure, greater soil life and less drying out. A handful of white bells can therefore gradually develop into a lively, varied garden scene whose value extends far beyond its short flowering period.

Comments
No comments yet. Be the first to comment!
Leave a Comment