
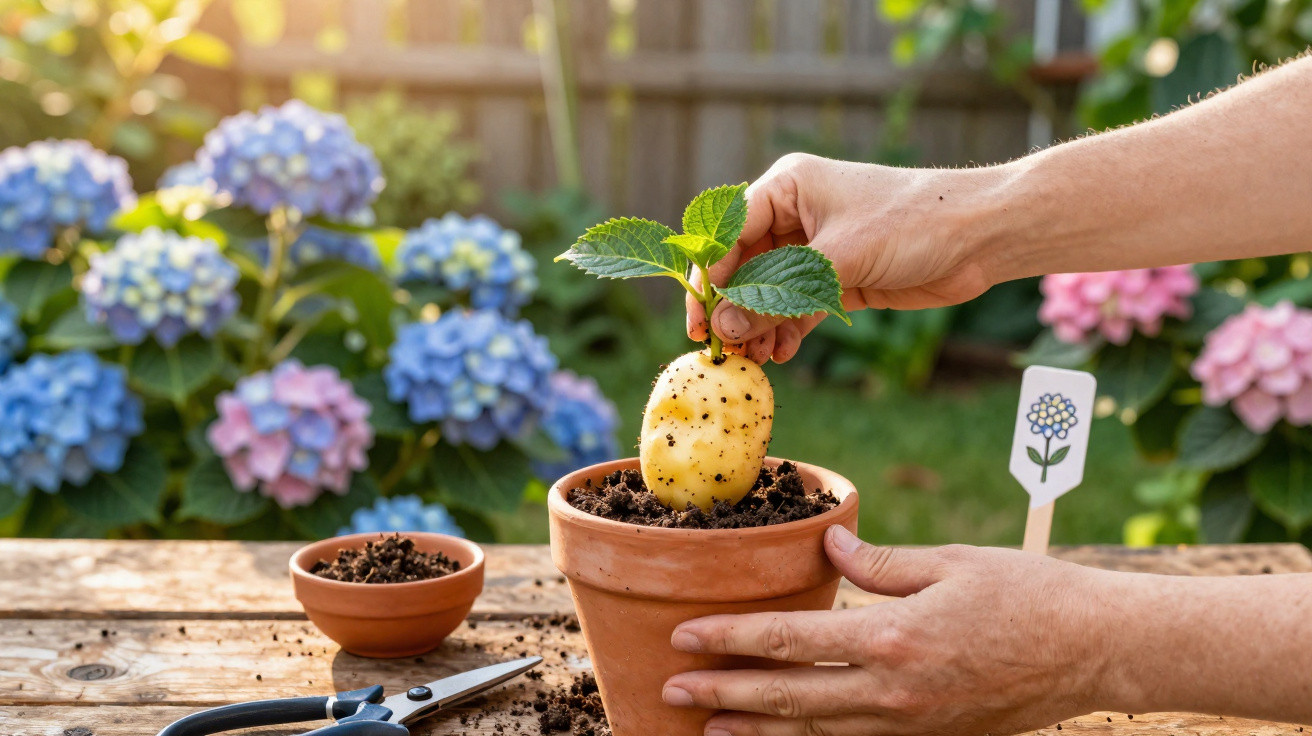
When inspecting the garden in spring, it is not unusual to find brown, bare hydrangeas that appear to be beyond saving. Many people then throw the plants away in frustration. Professionals, however, advise a very different approach: rather than giving up on the plant, you can grow a new, vigorous shrub from healthy remaining shoots – and this is where an everyday vegetable from the kitchen comes in.
Why many hydrangeas are not truly dead after winter
After periods of frost, hydrangeas often look severely damaged. Their leaves have gone, the shoots seem dry and the tips are black. Yet appearances can be misleading. In many cases, the lower parts of the plant are still alive, as are the inconspicuous buds at the nodes along the shoots.
Anyone who reaches for pruning shears – or even a spade – too quickly may be wasting considerable potential. A straightforward propagation method can produce fresh young plants from the still-living shoots, and these are often hardier than the original shrub.
The trick: A hydrangea that looks half-dead can still provide usable cuttings – and a potato helps them begin a new life.
How a potato helps propagate hydrangeas
For several years, gardening professionals have recommended a slightly unusual technique: inserting hydrangea cuttings into a potato. It may sound like an internet myth, but there is a genuine principle behind it. The tuber retains water, keeps the cut end moist and therefore creates a far more favourable microclimate for root formation.
A moist potato prevents the delicate cutting from drying out quickly – one of the main reasons many attempts to grow cuttings fail. It also contains a little starch and some nutrients which do not replace fertiliser, but may be useful during the initial stage.
- The potato acts as a small water reservoir directly around the cut end.
- It holds the cutting steady so that it remains firmly positioned in the soil.
- For several weeks, it provides an even, moist environment.
Hydrangeas in particular, as well as roses, often respond to this “water covering” around the cut surface with noticeably better rooting.
The best time for the potato trick
Choosing the right time is crucial to success. Experts recommend propagating weakened hydrangeas from late spring into summer. At this point, the shoots are green, flexible and not yet woody. Ideally, they will not be carrying flowers either, so the plant directs its energy towards producing roots rather than forming blooms.
Attempts made too early, immediately after winter, often fail because the shoots remain weak or late frosts damage the fresh cuttings. At the height of summer, on the other hand, intense heat can overwhelm the tender young plants.
Step by step: propagating a hydrangea with a potato
1. Select a suitable shoot
Look for a healthy, still-green shoot without flowers on the weakened hydrangea. It should:
- measure around 10 to 15 centimetres long;
- have at least two clearly visible nodes, where leaves emerge;
- show no brown patches or fungal spots.
Using clean, sharp secateurs or a knife, cut the shoot at a slight angle. Remove the lower leaves so the section that will go into the potato is bare.
2. Optional: use a rooting aid
Many gardeners briefly dip the lower end of the cutting into rooting powder or gel. This can speed up root development, although it is not essential. If you do not have either at home, you can still try without it – the potato alone already improves the chances considerably.
3. Prepare the potato
Choose a firm, medium-sized potato. Potatoes with sprouts or shrivelled areas are unsuitable, as they are often already weakened. With a pencil or thin wooden stick, make a narrow hole about five centimetres deep in the tuber.
The hole should be narrow enough for the cutting to fit tightly without wobbling.
Now place the cut end of the hydrangea shoot into the hole. Press the potato gently so the shoot is secure and has good contact with the moist interior.
4. Plant it and choose the position
Next, bury the prepared potato and cutting completely in a pot filled with free-draining compost. Only the upper section of the shoot should remain above the growing medium. For the first stage, a blend of standard potting compost with a little sand or perlite works well, allowing water to drain more easily and preventing waterlogging.
Place the pot somewhere bright but away from full sun. Morning sun or bright shade is ideal. Strong direct midday sun can stress and dry out a cutting that has not yet rooted.
5. Water and wait
Keep the compost consistently moist, but never saturated. Although the potato supplies moisture internally, too much water from outside can cause rot. After a few weeks, use a simple test: tug the cutting very gently. If there is resistance, roots have formed.
| Period | What happens? |
|---|---|
| Week 1–2 | The cut surface heals and the first fine roots begin to form. |
| Week 3–4 | Roots branch out, the cutting becomes more secure and the first new leaves may appear. |
| From week 5 | The young plant is considered established and can soon be moved into a larger pot. |
When the cutting becomes a young hydrangea
Once the cutting is clearly secure and offers good resistance when gently pulled, the most exciting stage begins: the new hydrangea starts growing independently. Fresh, light-green leaves will usually emerge at the tip or from the nodes.
The young plant still needs extra protection at this stage. Continue watering regularly without overdoing it, and protect it from cold winds and blazing sunshine. A partially shaded position, such as beside a north- or east-facing wall, has proved effective.
After several months in its pot – often by the following spring – the hydrangea can be moved to its permanent position in the garden. The soil should be rich in humus, slightly acidic and loose. Many varieties tolerate strong midday sun poorly, particularly straight after planting out.
Common mistakes that can make the trick fail
Although this method appears simple, there are several common pitfalls. Knowing them can prevent plenty of frustration.
- Compost that is too wet: Waterlogging encourages rot in both the potato and the cutting.
- A position that is too sunny: Direct sun rapidly dries out young shoots.
- An old or diseased potato: Soft, rotting tubers break down quickly.
- Cuttings that are too short: With fewer than two nodes, there is insufficient reserve material for new shoots.
Trying several cuttings at once increases the likelihood that at least one plant will thrive in the end.
More than hydrangeas: where else a potato can help
The potato method is not limited to hydrangeas. Many shrubs and ornamental plants with soft or slightly woody shoots respond similarly well to the tuber’s moist environment. Gardening enthusiasts use this trick for roses, lavender and certain herbs, including rosemary.
Even so, it is not suitable for every species. For plants that prefer extremely dry conditions, the extra moisture may be harmful instead. A quick look in a gardening guide or at the plant label can help you assess whether it is appropriate.
Why the effort is worthwhile
The potato trick does more than save money, as there is no need to buy a replacement plant. It also makes it possible to preserve cherished varieties that may be difficult to find or valued for a particular colour.
There is an emotional benefit too: with a little patience, a shrub that seemed lost can become a new, strong hydrangea bush. Many amateur gardeners say this process is precisely what gives them a special connection with their plants.
Anyone who enjoys this method can take the next step and experiment with different varieties: mophead hydrangeas, panicle hydrangeas and lacecap hydrangeas root at different speeds, but the basic idea remains the same – a healthy cutting, a fresh potato and a little patience are enough to bring new life to the garden.


Comments
No comments yet. Be the first to comment!
Leave a Comment