
No expensive paving and no brickwork: an unexpectedly simple concrete trick can give the edge of your driveway a completely fresh look while solving an irritating everyday problem.
Anyone with a gravel driveway will know the issue: every time you use a leaf blower, stones end up on the lawn, the edge becomes ragged and the entrance starts to look untidy. More and more DIY enthusiasts online swear by a surprisingly effective technique using bagged concrete. At first, it sounds almost too straightforward, but it works remarkably well in practice provided you follow a few key rules.
Why a neat driveway border makes such a difference
The entrance is the first part of your home that guests and neighbours notice. A defined, sturdy driveway edge draws the eye and gives the whole plot a sense of order. It matters more than many people expect, especially beside gravel or chippings paths.
A good border keeps gravel where it belongs, protects the lawn and immediately makes the driveway look more premium.
Without a solid boundary, stones are pushed into the grass whenever it rains or the leaf blower is used. This results in:
- unattractive edges with bare patches in the lawn
- lost gravel that needs topping up in spring
- more difficult mowing, as stones can get into the mower mechanism
Many homeowners then consider paving or natural-stone edging. While these can look attractive, they can easily cost several hundred pounds and involve substantial work, from preparing the base to laying the stones correctly.
The surprising solution: concrete bags as ready-made edging blocks
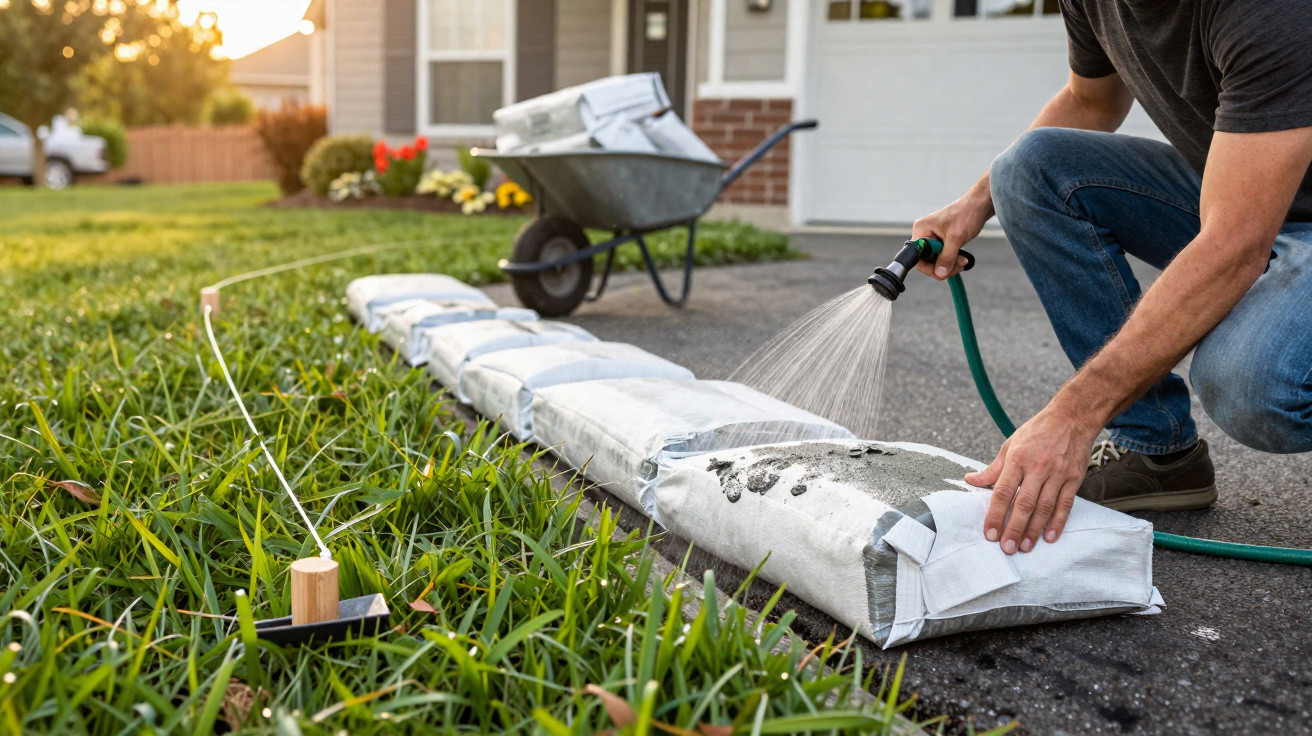
The technique seen in DIY tutorials is simple: unopened bags of ready-mix concrete are laid along the driveway, soaked and left to harden into solid blocks in position. The paper bag effectively acts as formwork before gradually breaking down on its own.
Once finished, the result resembles large, softly rounded stones. It forms a continuous line that neatly contains the gravel and frames the driveway visually, without timber shuttering, a concrete mixer or labour-intensive brickwork.
There is another benefit: costs remain manageable. A bag containing around 22 to 25 kilograms of ready-mix concrete is usually available from DIY retailers for a single-digit price. Depending on the length of the driveway, the overall cost is broadly similar to basic paving edging, but involves far fewer stages of work.
Choosing suitable concrete – and the mistake many people make
For this trick to work, selecting the right product is crucial. This is where the most common error occurs: many people accidentally buy ordinary cement because the bag looks similar at first glance.
You must always use ready-mix concrete containing aggregates – never pure cement.
What to check when buying concrete bags
- Ready-mix concrete rather than cement: Only ready-mix concrete already contains the sand and gravel needed for strength.
- A paper bag without a plastic coating: The outer layer needs to absorb water and be able to decompose over time.
- Weight per bag: Bags weighing 20–25 kg have proved practical. They are still manageable to carry while providing enough material for a robust block.
- Storage condition: The bags must not be lumpy or already partly set.
You will also need a garden hose, gloves, safety goggles, a spade or shovel, and a taut string line to ensure the finished edge looks genuinely straight.
Preparing the driveway for concrete bag edging
The ground must be prepared before you lay the first bag. Cutting corners at this stage can lead to cracking or blocks that later tilt. A little groundwork pays off over the long term.
Step 1: Plan and mark the route
Run a string line along the intended driveway edge. This immediately reveals whether curves look right or an awkward kink needs correcting. Use the existing driveway and lawn edge as guides; the aim is an even line that appears calm and balanced from the road as well.
Step 2: Excavate and prepare the ground
Dig a narrow trench along the marked line, only a few centimetres deep – just enough for the concrete bags to sit slightly below ground level rather than appearing to perch on top.
A thin, compacted layer of gravel or chippings in the trench improves drainage and reduces frost-related stress. Otherwise, standing water beneath the blocks can cause fine cracks sooner or make individual sections tip.
How to lay, wet and shape concrete bags correctly
This is the stage that always seems effortless in videos, yet it requires a little care in real life if the edging is to look even.
Step 3: Position and arrange the bags
During transport and storage, the finer components of the concrete generally settle at the bottom. Turn the bags so that the side originally resting at the bottom of the stack faces upwards. This creates a more consistent, smoother surface later on.
Place the bags tightly together along the string line. Small gaps can be prevented by gently pushing each bag against the next one. For attractive curves, turn the bags slightly, but keep the overall line in view.
Step 4: Add water in measured amounts
Use a knife or screwdriver to make several openings in the top of each bag. Do not overdo it: a few slits are enough to allow water to enter.
Too much water washes fresh concrete out of the bag, while too little prevents it from curing evenly.
Wet the bags with the garden hose until the paper is fully saturated. The surface should be wet but not flooded. Avoid forming puddles, particularly where the edging meets the lawn.
Carefully press each bag down slightly using your foot or a wooden board. This evens out minor height differences and gently rounds the edges, giving the finished border a pleasingly soft appearance while reducing sharp corners.
Curing time, maintenance and possible adjustments
Ready-mix concrete only reaches its full load-bearing strength after almost four weeks. After roughly one day, the blocks will be hard enough to walk on safely. Heavy vehicles should not drive over them or roll directly along the edge during this period.
The paper bag will gradually decompose by itself, provided it does not contain a plastic layer. Anyone who does not want to wait can use a pressure washer after the concrete has fully cured, removing the remaining pieces from the surface in strips.
A major advantage of this method is that individual blocks can later be removed or repositioned if you are unhappy with the appearance or route. Use a spade or crowbar to release the relevant block from the ground and adjust the line.
Where concrete bag driveway edging works best – and its limitations
Concrete bag edging is particularly suitable for narrow driveways, garden paths or side parking strips surfaced with gravel. In these settings, the concrete blocks provide a clean separation between the driving area and planted sections.
| Advantages | Limitations |
|---|---|
| Low material costs | Delicate shapes are not possible |
| Can be installed without formwork or brickwork | The appearance remains relatively rustic |
| Achievable for DIY beginners | Not ideal for very tight curves |
| Quickly improves the appearance of a driveway | The ground must be prepared carefully |
For formal front gardens with elaborate planting or contemporary architecture, conventional natural-stone or steel edging may sometimes suit the style better. The concrete bag option has a more down-to-earth, robust look, but is highly practical for everyday use.
Design ideas: from rustic to unexpectedly elegant
With a little creativity, the appearance of the edging can be enhanced. Some DIY enthusiasts lightly brush the surface after curing to bring out more texture. Others coat the blocks with concrete stain or add flat decorative stones along the edge.
For a softer transition into the lawn, plant low-growing ground cover directly beside the concrete line. Small cushion-forming perennials will gradually conceal the lower area, while the top edge of the blocks remains clearly visible.
What to know about safety and durability
When working with concrete, gloves and safety goggles are not optional; they are essential. Cement-based products irritate skin and can cause permanent eye damage. Rinse off splashes immediately with plenty of water.
The lifespan of the edging depends heavily on concrete quality and drainage. In areas with pronounced freeze-thaw cycles, a well-compacted gravel layer beneath the blocks is worthwhile. Those who check small cracks every few years and repair them early can expect long-lasting results.
Ultimately, this method turns a simple DIY-store product into a stable, practical driveway edge. With a weekend of work and some planning, unremarkable concrete bags can become a driveway border worth showing off – while significantly reducing the irritating spread of gravel across the lawn.




Comments
No comments yet. Be the first to comment!
Leave a Comment